5 Steps To DeClutter Your Office
5 GIANT Steps To DeClutter Your Office
IT’S TIME TO RECLAIM YOUR OFFICE & CREATE A PRODUCTIVE WORKSPACE YOU WANT TO BE IN
In 5 Ways To Tame Time, we discussed how de-cluttering your office helps you be more productive and efficient during your work day. Here we will explain how to tackle the job.

BlackWhite Business Helper offers assistance with this task if you do not have the time to do it on your own. Schedule an in-Office estimate here.
5 GIANT Steps To DeClutter Your Office
IT’S TIME TO RECLAIM YOUR OFFICE & CREATE A PRODUCTIVE WORKSPACE YOU WANT TO BE IN
In 5 Ways To Tame Time, we discussed how de-cluttering your office helps you be more productive and efficient during your work day. Here we will explain how to tackle the job.
ONE GIANT STEP FOR…
Don’t let ‘GIANT’ steps scare you - remember the game, ‘Mother, May I’? Good! Yes, you make take 5 Giant Steps To DeClutter Your Office & Reclaim Your Space! Each step is a BIG step that brings you closer to a comfortable, welcoming and more productive space. Also, each step is a giant step of commitment to the process, your self and your business.
You will want to allow enough time for this project because it is a PROJECT! The amount of time to allocate depends on the size of your office, how long it’s been since you’ve done a deep clean/reorganization, and how motivated you are to jump on it. BARE MINIMUM for any office is ONE FULL DAY - most offices will require two days!
Your Business Helper offers a hands-on assist to help you get through it more quickly & efficiently. Just give me a call to set up an office visit and consult to determine how long and how much.
If you are determined to do it on your own, these 5 Steps will help you turn your workspace into an office that will welcome your staff and your clients (without embarrassment).
GIANT STEP #1: PREPARE
In most cases, this 5 step process seems daunting. Being prepared mentally & physically is as important as carving out the time to begin. We all get overwhelmed at times which can make us lethargic or depressed about tackling a job like this - BUT - remember, you are doing this Step-by-Step and broken down into these manageable steps, you will be able to win the day (or weekend)!
Once you have your mind made up, it’s time to get ready to move forward. Gather some big boxes, totes, a big trash can, trash bags, etc and if need to, make space in another room or hall (bc there probably is no space available in your office), take some deep breaths and reassure yourself it won’t be as bad as you think.
You will need one box or large garbage can for TRASH
Have a box or tote for DONATIONS
One or two totes for MUST HAVE items + space for larger items
2+ boxes for items you must SORT
Doing this will motivate you! If you do get a bit nauseous, remember that excitement and fear react in your body the same way - choose excitement! This is going to feel so good when you are done!
GIANT STEP #2: SORT
Of course, this is why you gathered the boxes, totes, cans and bags. Name or tag them.
TRASH- This includes the obvious paper cups, take-out cartons, and the like, but also those wadded balls of paper that missed the trash can (or hoop on the door), pens that don’t write, outdated calendars, faxes from restaurants and telemarketers, etc. Your filled doodle pads, anything broken or not working… chunk it! You will add more to this pile as you work through the room.
DONATIONS- For those items you never use, old gifts from staff or kids (if don’t use), any furniture that is too big for your space, books you no longer need, etc. You can also include dreary (or cheap) curtains, faded artwork (trash or donate?), whatever you’re hiding in those storage boxes that do not serve your business. Of course, you can take certain items to your home if you can’t let them go - Do you have space in the attic or garage?
MUST HAVE- These are things that pertain to your business. If able, you can reduce the size of this pile by shifting any items that just need to be filed away into a separate box.
GENERAL- This area is for those things you need to make a decision on. You may want to section this out into different boxes: To Be Filed, Personal, To Be Stored (excess office supplies, files over year old, etc) and any other category you determine. I usually make a few specific + a bigger general box to sort more thoroughly later.
Ready? You can start in one corner and move around the room, go directly to your desk or shelves, or just start grabbing up any trash or donation items to get your ball rolling. I prefer to start with the biggest, messiest area in the room - because once you’ve tackled it, the rest seems like a piece of cake. Plus, getting the hard part over with first when you have the most energy and resolve is extremely helpful in the process.
This is a First Sort! Determining what is garbage or an item to donate is easier; anything that you feel torn on or just can’t decide on will go into the ‘general’ pile in this stage.
GIANT STEP #3: DUMP & CLEAN IT
Step 3 may be the most difficult if you are doing this during work hours or if your space is really limited, but do it if at all possible. This is a guideline to help you make the process easier - not set in stone. However, the act of removing everything and starting fresh is a magical feeling that will inspire & motivate you.
So, if you can, dump the room! Take out everything! All your sorted boxes, furniture, art… every thing! Now is your opportunity to really clean the floors, walls, that closet, any built-ins, etc. Don’t forget the light fixture/ceiling fan and brighten up any windows and sills. Hit the corners and baseboards with broom or vacuum. If you’ve been wanting to put down a new rug, perfect timing!
Throw the old rug out, dust, vacuum and wash it all down. if you can afford it and/or don’t have time for this stage, hire a pro cleaner. It shouldn’t be much since it’s an empty room.
GIANT STEP #4: SORT AGAIN
If you can enlist help to clean the empty space, you can move on to this step and complete your office makeover in less time! Step 4 is when you delve into that General pile and/or any sub-piles you made. If you have an assistant or secretary, you can definitely hand off the To Be Filed box; however, if you do your own filing, you may want to schedule an afternoon just for that.
Go through these boxes to determine what really needs to stay in your office, what can be stowed in a closet, what can be donated or thrown away. This is also the stage where you can really sort into what will go into your desk, on your desk, on your shelves, etc.
Make a pile for decor but try to keep this to a minimum to increase the flow of energy in the space and make it easier to keep clean. A more minimalist decor creates a better work environment and is more pleasing to your guests.
GIANT STEP #5: PUT IT BACK TOGETHER
You may very well have been thinking your office was broken and could never be put together again - but alas, you should be able to see the end and feel good about all the work you’ve done so far. Now that it has all been sorted and cleaned and resorted and reduced, it is time to take a look at the empty space and reevaluate the layout of your office.
Do you want to put it back the way it was? Did it have good flow? Did you bump a hip or an elbow anywhere and wish you had more room? Was there room for a chair for an employee or a guest? Did the window cast a glare on your computer? Think about all the little things that annoyed you or made you dislike working in there…
Many believe the placement of your desk is of most importance when designing the layout of your office. As a command center, it should give you a clear line of sight to the door so you can see when someone enters. Here are some examples for proper desk placement:
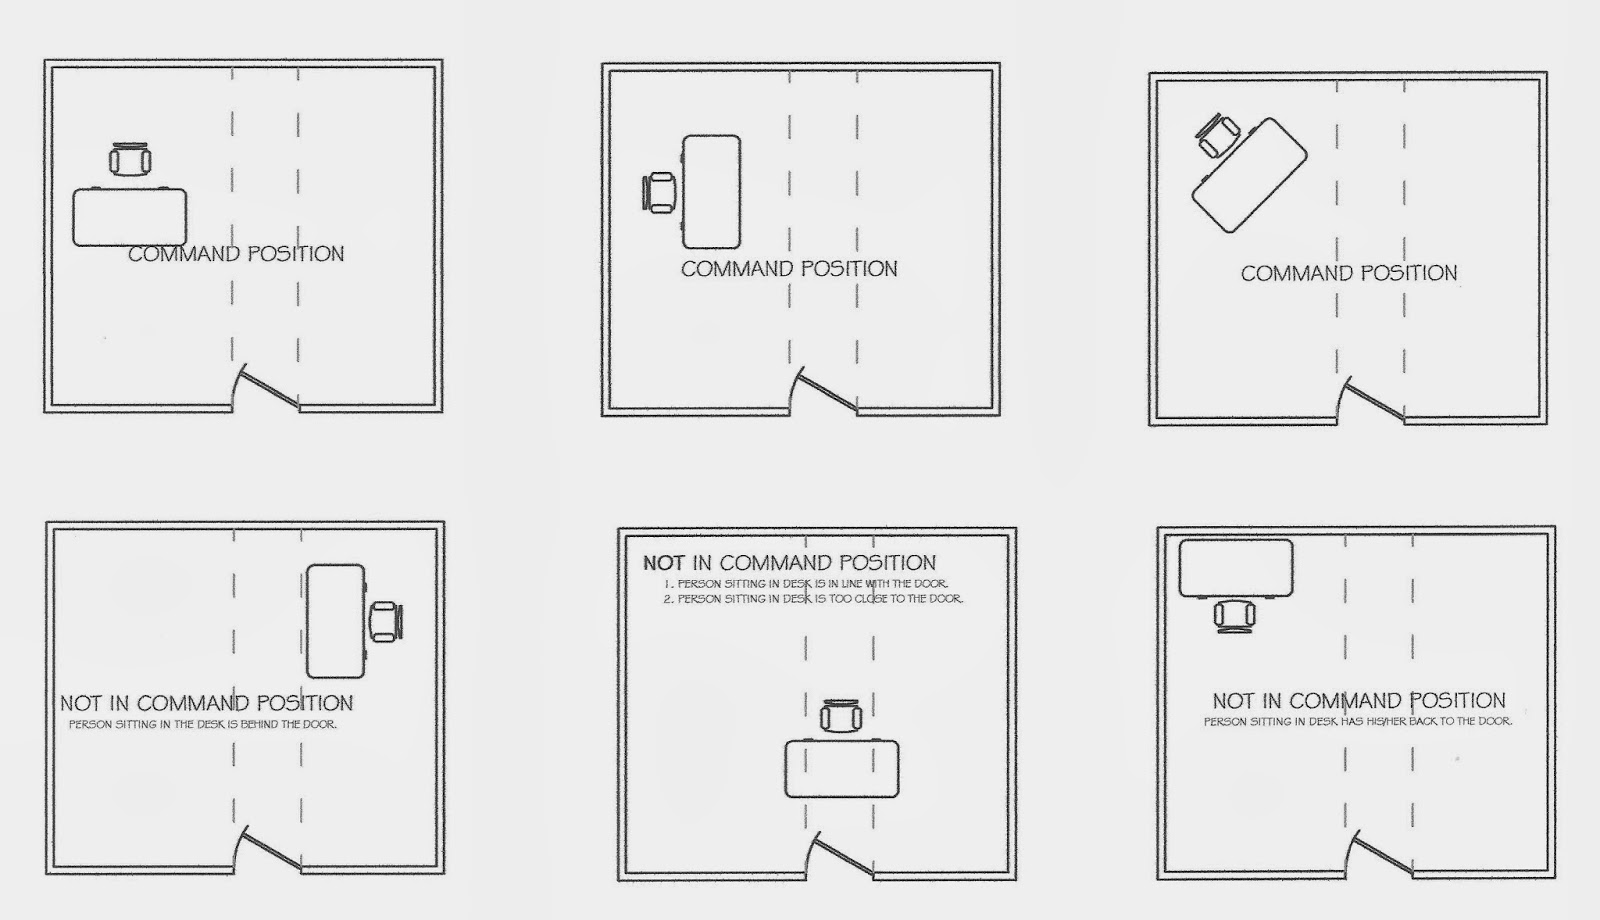
TAKE COMMAND OF YOUR OFFICE - Desk Placement is of great import in the design of your fresh office layout. Use these samples to help you choose a Boss position!
If you cannot place your desk where light from the window will not glare on your computer or in your eyes, invest in a good blind or blackout curtain for the one hampering your work. Natural light is beneficial to your health and your performance so try to keep as much of it available as you can; there are creative ways to use your window space and keep your office pleasing to the eye. Call on Your Business Helper when you need help on a fresh take for your office design.
#

If this is the year you want more from the effort you put in -but- need a bit of help to Tame the Time Eater, see how BlackWhite Business Helper can assist in making sure you reach your goals! Text or Leave a Message for me at 704.252.4913 and I’ll call you back within a few hours. You can also reach me by email at BlackWhiteBusinessHelper@gmail.com. *I usually return calls and answer mail between 9-10am or 5-6pm.
I hope you have enjoyed this article.
Please SHARE it and Follow my Blog for more interesting content to help you & your business!